

How to Host a Conan: Exiles Dedicated Server - A Step by Step Guide
Conan: Exiles isn’t as popular among server hosts as some, only supporting Windows natively, but you’ll see that there’s still plenty of variety out there. If those still don’t meet your needs, though, it’s worth considering self-hosting or a VPS host. It’s perfectly feasible to host on your own hardware if you don’t require 24/7 uptime, or on a provider’s hardware if you do. This guide will help you get a Conan: Exiles server up and running from scratch. Let’s dive right in!
Intro
The sad truth about both player-hosted and official game servers is that they rarely fit your specific requirements, whether it’s ping, moderation, or mods and config. Owning your own server lets you tailor it specifically to your needs, and while game server hosts like Nitrous Networks are simple, a dedicated server can cost no more than your electricity bill.
First, though, it’s worth emphasising that the paid route for dedicated servers is often the best choice. Purchasing a VPS gives you complete control over all of your server files, while ensuring you have the hardware and bandwidth for higher player counts. You may be surprised at how affordable they can be.
Purchasing and Setting up a VPS
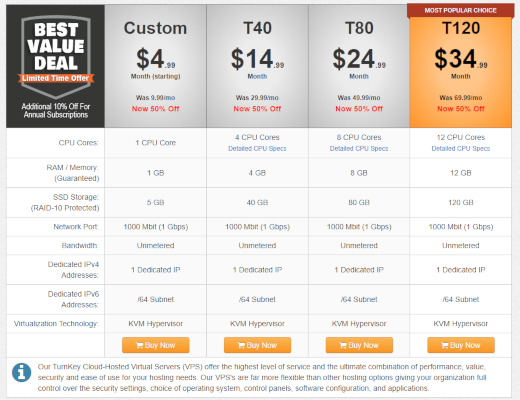
Our recommended VPS provider if your located in the US is TurnKey internet, who provides a number of different specification machines with great uptime, gigabit internet speeds, and reasonable prices. For the purpose of the guide, we’re configuring our dedicated Rust server on its most popular T120 subscription, which provides 12 CPU cores, 120GB RAID-10 storage, and 12GB RAM for $34.99 per month. Cheaper plans are available to target lower population servers.
If you need a server outside the US or in another city, we'd recommend one of A2 Hosting, Hostwinds Managed VPS or Unmanaged VPS. The process should be similar.
On TurnKey Internet's checkout page, users will see an option to choose the server location, with a choice of New York or California. You’ll also be able to choose the starting OS, which includes anything from Windows Server to CentOS 7, Ubuntu Server, Linux Mint, Ubuntu Desktop, or a custom ISO. Here, server specs can also be adjusted in a modular fashion.
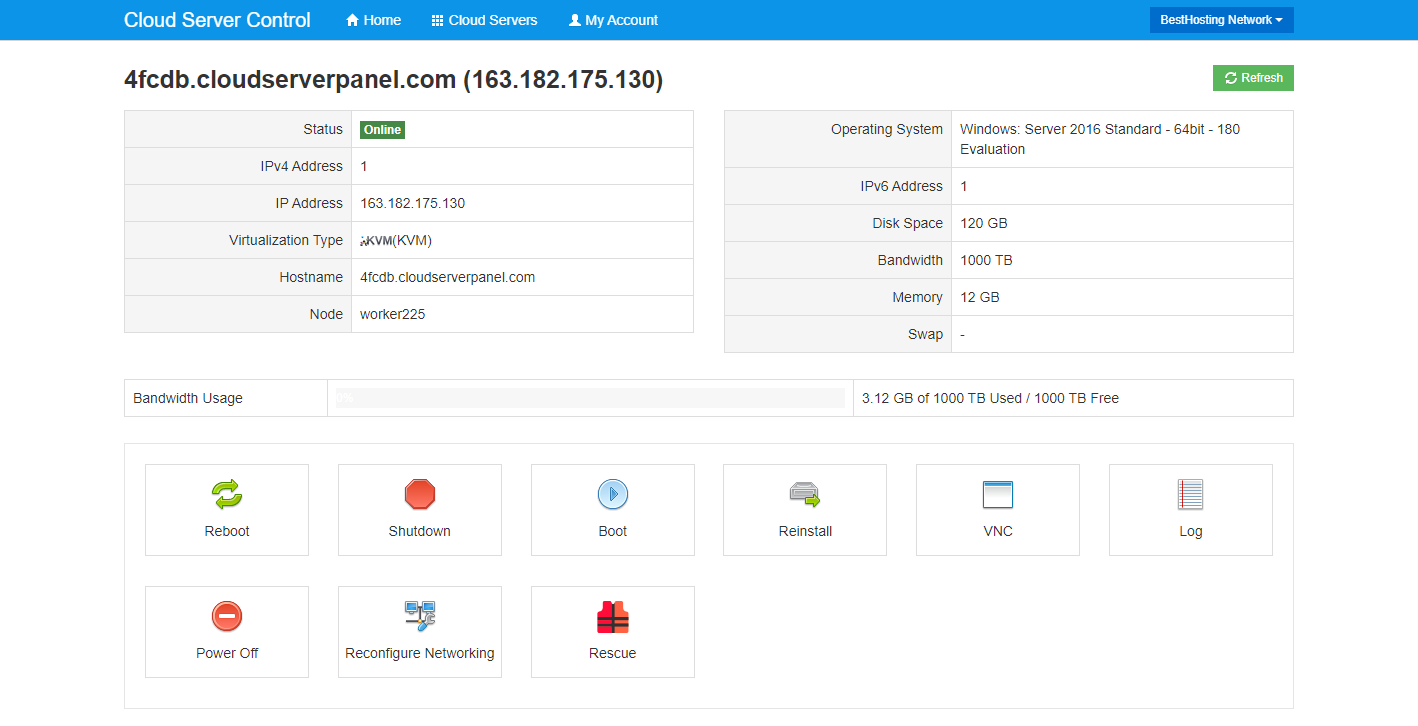
After purchase, users will receive an email with details for their client area. Under products and services, you can click the relevant VPS for more detail. On the left sidebar, users will note a link to their VPS control panel, alongside a username and password. Logging in with the correct details will present users with a variety of maintenance features, from restart, shutdown, and boot, to the ability to change the OS, reconfigure networking, and view the server via a web client.
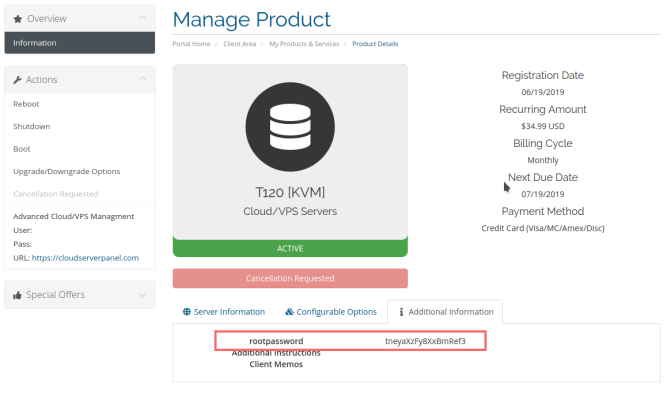
As well as through the web, you can access the server via Windows’ built-in Remote Desktop tool. Simply enter the IP address listed in the Cloud Server Control, using Administrator for a Windows host and Root for Linux. The root password can be found under the ‘Additional Information’ tab of the product in the TurnKey internet Client Area.
A word of warning: DO NOT share the root password with anyone. it grants full control of the server to anyone who has it.
You can now use your server as you would a normal PC.
System Requirements
By now you’ll be mulling over whether you need to pay for a VPS or if your home connection and hardware is enough to support the number of players you have in mind. The good news is that a small Conan: Exiles server of up to 10 people isn’t especially demanding, and Funcom is one of the few developers that publishes recommended specs in a tiered manner. Here’s the full list:
Small, 10-player server
CPU: Intel Core2Duo, 3.0 GHz
RAM: 8 GB
Disk space: 35 GB
Medium, 35-player server
CPU: Intel Core i5 2400, 3.1 GHz/3.4GHz Turbo
RAM: 8 GB
Disk space: 35 GB
Large, 70-player server
CPU: Intel Core i5 6700, 3.4 GHz/4.0 GHz Turbo
RAM: 16 GB
Disk space: 35 GB
Officially, Conan: Exiles servers only support Windows. Workarounds exist via Wine, but you should generally avoid this unless you don’t have a Windows 7/8.1/10 license.
Setting up a Conan: Exiles Server in Windows
Thanks to Funcom’s tools programmer, creating a dedicated server on Windows is incredibly easy. The officially supported Dedicated Server Launcher cuts out all of the commands you’d usually have to run via SteamCMD and simplifies the configuration process.
This is generally the method we suggest to deploy a dedicated server, but we’ll also be covering manual deployment so you can gain a deeper understanding of how everything works.
Deploying a server with the Dedicated Server Launcher
There are two versions of the Dedicated Server launcher available; a stable and a beta version. The beta launcher may have some additional features, but it could also lead to bugs and instability. Due to this, we’re going to be using the stable option in this tutorial. You can download the latest release of both versions on Funcom's Dedicated Server Launcher post (under Installation)
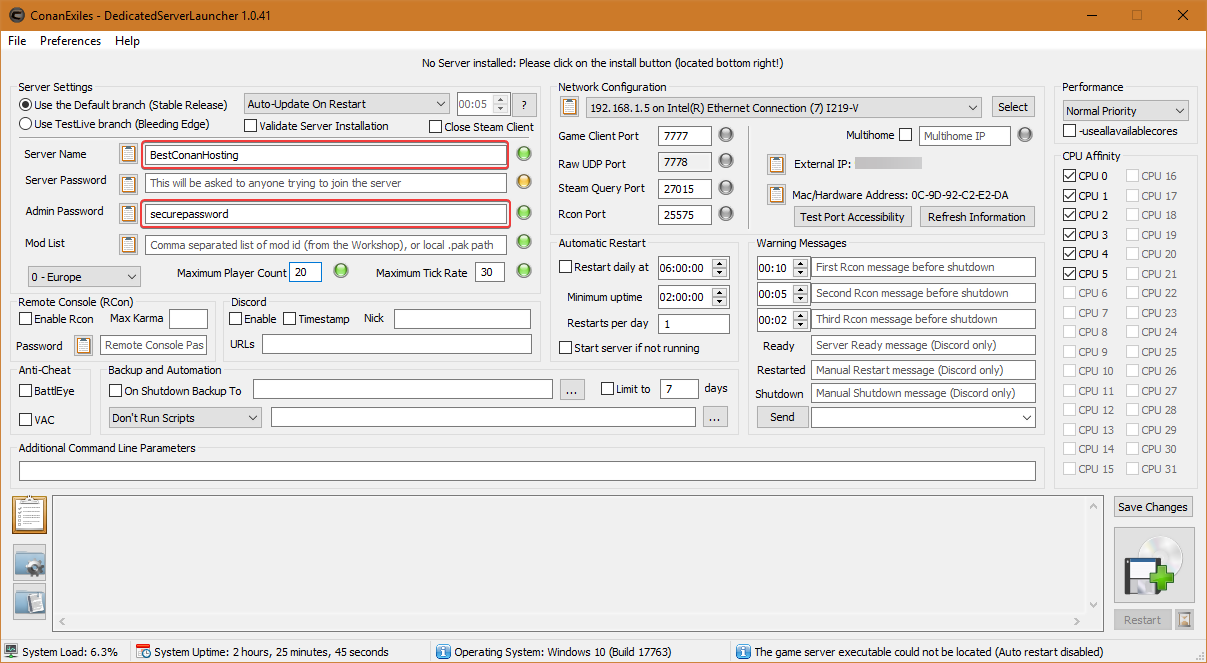
Running the launcher for the first time will present the above, slightly overwhelming screen. For now, you can just fill out the Server Name, Admin password, Max Player Count, and Region. For more detailed explanations of each setting, you can refer to our article on how to configure a Conan: Exiles server.
After entering the relevant options, click Save Changes, followed by the save and disc icon. The application will open SteamCMD, which will automatically input the commands required to install your server. It will create a new directory in whichever folder you placed the DedicatedServerLauncher.exe. Your server should start automatically and be ready to use.
Deploying a server with SteamCMD
If you’re having trouble with the tool, using SteamCMD directly is the best option. This method is still very simple for setup, but you’ll have to do some manual config file tweaking later.
First, download SteamCMD here. Extract the zip file to a dedicated folder and create one for your server files (ours is e:/conanserver). Run steamcmd.exe as an admin. The tool will take a little while to download and install updates, after which you’ll see a Steam> prompt. Type:
login anonymous
force_install_dir e:/conanserver
app_update 443030
It may take a while for your server to download and install, depending on your connection. Once complete, you’ll see the ‘Success!’ message, and can then close SteamCMD. Head to the install folder and run StartServer.bat.
You can find all your config files under E:/conanserver/ConanSandbox/Saved/Config/WindowsServer. Add the following to your Engine.ini:
[URL]
Port=7777
[OnlineSubsystemSteam]
ServerName= YourServerName
ServerQueryPort=27015
ServerPassword= YourServerPassword
At the bottom of ServerSettings.ini, add:
AdminPassword = SecureAdminPassword
These changes will be enough to get your server up and running, however, it’s highly recommended that you configure your server further for a lag-free experience. You can use our Conan: Exiles server configuration guide to help you with that.
Setting up a Conan: Exiles server in Linux
As mentioned earlier, the Conan: Exiles server doesn’t run natively on Linux. It’s entirely possible thanks to Wine and Screen, but you should know that you’re more likely to run into issues. If you have a license key for Microsoft’s OS, it’s best to use that.
That said, setup for Conan: Exiles on Linux is much the same as it is for Windows, with a few additional steps. First, you should create a new user account specifically for the server. This is always recommended as to do so as a root user would compromise your security. Type:
sudo adduser conanserver
su – conanserver
mkdir server
Now we need to install the dependencies required for the server:
sudo apt-get install lib32gcc1 software-properties-common -y && sudo dpkg --add-architecture i386 && sudo apt-get update
We can now install SteamCMD with:
sudo apt-get install steamcmd
We need to change steamcmd’s platform type to Windows, as we’ll be using Wine to run the server as a windows application. While we’re there, we can bundle the server installation into the command with:
cd /usr/games
steamcmd +@sSteamCmdForcePlatformType windows +login anonymous +force_install_dir /home/conanserver/server +app_update 443030 +exit
Once the server is installed, we need the ability to run it. As mentioned, we’ll be using Wine for this. First, we must install the key that was used to sign Wine packages. Without it, we’ll get a security error when trying to install it. The recommended way to do this is:
wget -qO - https://dl.winehq.org/wine-builds/winehq.key | sudo apt-key add -
Now we can add the repository for Wine. You’ll need to replace the word after the url depending on your Ubuntu version. 19.04 is disco, 18.10 is cosmic, 18.04 bionic, and 16.04 xenial. If you have a different version to what’s listed, check your version code name here.
Our test server is running 18.04, so we’ll run:
sudo apt-add-respository ‘deb https://dl.winehq.org/wine-builds/ubuntu/ bionic main’ && sudo apt-get update && sudo apt-get install winehq-stable
For ease of use, the gamepedia wiki recommends installing screen and xvfb with:
sudo apt-get install screen
sudo apt-get install xvfb
Our server is pretty much ready to run, but we should generate all of the files so you can properly follow our How to Configure guide. Type:
cd server
xvfb-run --auto-servernum --server-args=’-screen 640x480x24:32’
wine ConanSandboxServer.exe -log
Once the process completes, press Crtl+C to stop the server. Check that your .ini files are present with:
cd server/conansandbox/saved/config/windowsserver
ls
You can edit the config files with nano, followed by their file name e.g. nano windowsserver. You’ll want to at least change basic values like the name and admin password.
Firewalls & Port Forwarding
With our server up and running, we need to ensure that players can connect no matter their connection type. To do so, it’s necessary to open the correct ports, as without this, some players may not be able to properly send and fetch data from our server.
The process of port forwarding differs slightly depending on your router model or VPS host. For the latter, it’s best to get in contact with the support team and determine the best way to proceed. If you’re hosting at home, search for your router via this resource, or google “Port forwarding [router model/name]. You’ll want to open the following ports:
- Game Client: UDP 7777
- Raw UDP Port: UDP 7778
- Steam Query Port: UDP 27015
- RCON Port: TCP 25575
On Linux, it may be necessary to adjust your iptables - the OS’ firewall. You can do so with the following commands in terminal:
iptables -P INPUT ACCEPT && Iptables -P OUTPUT ACCEPT && iptables -F && iptables -A INPUT -m conntrack --cstate ESTABLISHED,RELATED -j ACCEPT && iptables -A INPUT -p udp --dport 7777 -j ACCEPT && iptables -A INPUT -p udp --dport 7778 -j ACCEPT && iptables -A INPUT -p udp --dport && 27015 -j ACCEPT && iptables -A INPUT -p tcp --dport 25575 -j ACCEPT
sudo apt-get install iptables-persistent -y
invoke-rc.d iptables-persisent save
Your firewall is now properly configured to allow Conan: Exiles traffic from outside sources. Be aware that if you change any of the ports during the config phase you may need to add them to the iptables.
Conclusion & Maintenance Tips
That wraps up the basics of creating a Conan: Exiles server, but being a server admin is a long-term commitment. We always recommend you perform period maintenance on your server, installing the latest security patches and drivers, defragmenting your drives, and giving the physical hardware a clean if you have access to it. You should also restart your server every now and then, preferably daily, at times players are unlikely to be active. The official launcher offers an easy way to configure this. Together, all these things will decrease the likelihood that your server will crash or be compromised.
In case something does go awry, however, you’ll want a recent backup ready to ensure your players don’t lose much progress. Any good VPS host will have frequent, automatic backups of their server state. If you don’t wish to use automatic backups, you should copy your entire server folder to an external hard drive periodically, while making use of Windows’ built-in backup tools.
Resources & Further Help
We utilized several resources in the creation of this guide, some which are great places to get more information. Other than configuration, which you can read about here, the following may be helpful:
- Conan Exiles Gamepedia – for more information on setup and config on various platforms.
- The Funcom Forums – guides, launcher information, and community support.
- Steam Community Forums – for general discussion and support.
If you have any further questions or notice an issue with our guide, email us at [email protected].